Such a special place
Such a special place

The final approach.......

The row leading into the circle

The final approach

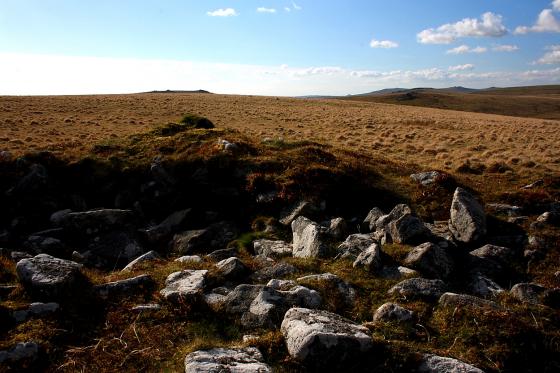
The tallest stone and the view down the Erme Valley

From ‘Dartmoor Illustrated’ by TA Falcon (1900).

Ha! A marvellously dishevelled stone circle. In my opinion... about as good as it gets.

Highlighting the ‘circle’s tallest stone, left...

A wonderfully remote stone circle, connected to Dartmoor’s longest stone row....

Looking WNW towards Langcombe Hill.

Looking eastwards. Knatta Barrow is (barely) visible as a small lump on the skyline.

The tallest stone, on the north side of the circle.

Looking south down the Erme Valley.


Looking ESE
03/05/2009

Upper Erme stone row cairn circle – March 2004

Cairn circle at the head of the Upper Erme stone row – March 2004

second trip to this distant dartmoor stone circle. An epic 10 mile round trip over the moor, but so worth it.
No other dartmoor stone circle has the solitude of this location.

Stone Circle from the north with the row coming in on the right.

Looking north on a very murky day in May. the stone row starts its 2 mile run over the moor from just behind the circle.
Gladman poses the question as to whether this is the most remote of all stone circles, even more so than its northerly counterpart White Moor. I made the trek to the latter 12 years ago and was inspired to write my first (self-congratulatory) fieldnote. Amongst the responses was one from The Sweetcheat suggesting Stall Moor as my next serious quest and four years ago I finally got round to making the attempt. Alas my companion at the time was in the process of recovery from Long Covid so had run out of puff by the time we’d made it to Stalldown stone row so continuing on to the circle was out of the question.
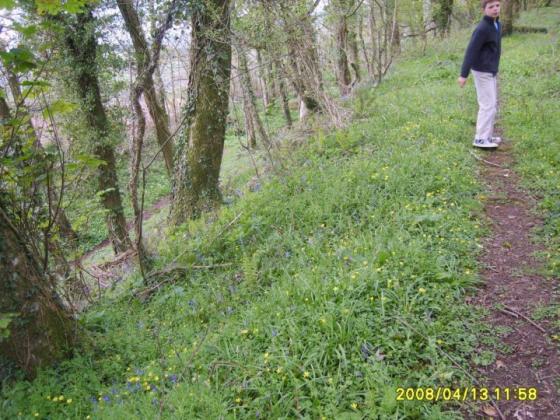
I’d been promising myself another go ever since and it finally came about yesterday with my daughter and her partner volunteering to accompany me on the expectedly lengthy but massively worthwhile expedition. The notes about suggested walks on The Cornwood Inn website indicated that parking between the village and the gate to the water treatment plant was a no-no; four years ago I’d been able to park the other side of the gate but this time I didn’t want to risk driving up there and finding it padlocked (as it was) so we parked in the village and walked the lanes which added a good couple of miles to what turned out to be at least 3/3 and a half from the gate to the circle.
That bit was relatively easy, a gravel path following the river all the way to the weir then picking our way steadily uphill until with the aid of my trusty binoculars I spotted what had to be the circle on the horizon to the north. We crossed the Bledge Brook and trudged through the tussocky grass, giving a Dartmoor pony and her foal a decently wide berth, and there it was.
OK, it’s not the prettiest of circles and bar one the stones are on the small side but for its setting with a tremendous sightline all the way down the Erme Valley it’s second to none. The Sweetcheat says it better than I can in his fieldnote; its very remoteness and the majesty of the surrounding landscape give it a presence that belies its appearance. Yes, the sense of achievement in getting to it – I still can’t decide if it’s technically more remote than White Moor but there can’t be much in it – undoubtedly amplified the exhilaration I experienced in my final few steps. To think it’s been here for 4.000 years, largely undisturbed and unvisited for probably at least three quarters of that timespan.........it’s a special place and I feel privileged to have briefly intruded on its solitude. A big thankyou to my distinguished TMA forerunners for pointing me in its direction.
And here it is! The uprights of the cairn circle come into view – empty, miles from anywhere, this is a real treat of a circle. Some of the stones lean alarmingly, the ground is wet and muddy around the stones, but I’m grinning from ear to ear. Without doubt worth the effort of the long walk, the circle is a gem that I doubt has many visitors, except the cows that graze a little way off and pay me no attention at all. Coming to places like this makes the heart sing, makes me feel glad to be alive and all the transitory worries of life seem so far behind. After a good while spent circling the site, then sitting in the ring (devoid of much sign of a cairn, by the way) I am reluctantly reminded of the long walk back to Ivybridge and the further delights still to be had on the way and head off south. The stones hang crooked on the skyline behind me for a moment, before disappearing back into their timeless solitude. I hope to come back here again one day, for this is a wonderful circle.
I have to agree with the earlier posts – this is a rough walk, and not for the faint hearted. Taking in Stalldown Row, this was a four-hour round trip on a pleasant (if windy) day. The ground is sometimes difficult, there are boggy areas obstructing travel, and the terrain is very exposed. Having said all that, if you’re reasonably fit and comfortable with a bit of exertion, this shouldn’t pose any challenge. Just exercise some caution where the weather is concerned, because you don’t want to get stuck out here in adverse conditions. Watch the forecast and take sensible precautions.
Warnings aside, this is a fantastic site. I’m inclined to agree with Gladman when he says Stall Moor may be more remote than White Moor (which is really saying something). The moors are desolate and beautiful around this site, and I spent the entire afternoon without seeing another living soul.
On the approach, I parked at New Waste (obvious parking spaces just through the first gate), then followed the path to the north. Once through the tree-lined area, I broke out across open country and ascended the hill to the north east. If you head for the top, you can’t really miss Stalldown stone row – which is an absolute stunner, and worth a visit in its own right.
I headed north from the end of the row, descending the slope and plotting a course towards the river. The terrain was very awkward underfoot during this section. Eventually, after crossing a gulley and a stream, the ground climbs ahead, and the circle can be found on top of this rise. Just keep the river to your right and keep heading up-hill and keep your eyes peeled.
The return journey was somewhat easier. I headed downhill to the south east, intersecting with the river. I followed along the edge of the river’s course until arriving at the weir. The ground was mostly reasonable underfoot, but I did need to navigate around some very boggy patches. After the weir, a solid track leads all the way back (I’d guess maybe two miles) to New Waste.
It’s up against some stiff competition, but I’d say that this was my favourite Dartmoor walk to date. The views are magnificent, and there’s a wonderful mix of scenery along the course of the journey. Bleak moors, rolling hills and valleys, streams, a river, woods... this walk has it all. I can’t wait to get back in the summer.
I approached this wonderfully remote stone circle from the south, parking at the road terminus near Watercombe, to the north east of the small village of Torr. From here it is possible to ascend Stalldown Barrow and take in the, quite frankly, superb stone row which runs north/south along the ridge first of all. There’s also a small cairn circle to be found here, too.
The ‘Kiss in the Ring’ is a good mile or so further on, above and to the north of the confluence of the River Erme and Bledge Brook, the latter having formed a deep gulley which needs to be crossed. The intervening ground between Stalldown Barrow and the circle features an additional cairn well worth seeking out, shown on the 1:25 OS map.
The atmosphere at the circle is incredible, the sense of place absolute, the feeling of peace and calm total. Why, even if you was to meet someone else here chances are they would be a fellow stonehead, since no tourist is ever likely to venture up here in a million years! My guess is that this might be the most remote stone circle in England, even more so that upon White Moor?
As if this wasn’t enough, Dartmoor’s longest stone row continues northwards from the circle to – according to the map – eventually peter out upon the slopes of Green Hill. I carried on a little further, taking a look at a rather substantial cairn, before returning back to the circle to simply enjoy being within this marvellously evocative landscape.
Note Mr Hamhead’s warning, however. This is a rough, tiring walking in good weather. In mist the ‘ghostly hounds’ affect your sense of direction, so make sure you have a map/compass. Don’t take it lightly, please.
I actually aproached this circle from the north, having followed the stone row from where it crosses the Erme River. A REAL adventure!
The “easy” way would be to come up the track from the hamlet of Torr near Cornwood, and then head out over the open moor, this is still not easy or a short walk.
Is it worth it? My photos may not do the circle justice...it was a very overcast day with the mist dropping down one minute and the next lifting. The whole Erme valley is full of antiquities...I think I past four stone rows and missed about four others on a eight mile walk, not including all the cairns and settlements, pounds, cists, and the odd standing stone...
Of the circle itself, there are 23 of the original 26 stones still standing, none taller than about three foot. It is a wild area....lots of soggy ground all around, even on top of the hill. Not a place to go if you are not sure of your map reading skills...but if you are, well worth it, the landscape is stunning.
William Crossing, in his 1900 ‘Stones of Dartmoor’ gave the following explanation of the stones of Stall Moor.
One Sunday afternoon a group of girls set off across the moor – once out of sight of the farmhouses they began to dance. This was of course extremely naughty as it was the sabbath day, when they should have been doing good or resting, not enjoying themselves. They accosted a young man and invited him to dance with them. Cheekily he refused to dance, saying that he would only play ‘Kiss in the Ring’. So the girls formed a circle and (one imagines) they played by him chosing one of them by touching her shoulder, then running off round the ring until she caught and kissed him. However things got a bit out of hand and the girls started grabbing and kissing him out of turn, so he demurely ran off, and they followed, running in a long line. As is usually the way, these transgressors of the Sabbath got turned into stone for their behaviour, and you can see them as the stones of the circle and the row. William Crossing rather bizarrely suggests that perhaps they were petrified for failing to abide by the rules of a game. So no cheating next time you’re playing ludo.
(I have paraphrased from a summary of Crossing’s original story in Westwood and Simpson’s ‘Lore of the Land’ (2005))
Also known as “The Dancers” or “Kiss-In-The-Ring”.
The circle is 16.5m across, with 26 stones
Handy notes and photographs illustrating much of the route.