
Taken 26th August 2002: This shot was taken from the road, and shows the stone sitting in a v-shaped slice in the bracken on the far side of the field. Nant Lwyd (Lwyd stream) is behind the stone in the trees.
Image credit: Simon Marshall

Taken 26th August 2002: This shot was taken from the road, and shows the stone sitting in a v-shaped slice in the bracken on the far side of the field. Nant Lwyd (Lwyd stream) is behind the stone in the trees.

Taken 26th August 2002: This Bronze Age standing stone is relatively easy to find from the road. I exercised my right-to-roam and wondered into the field to take this photo.

Taken 20th July 2002: Here are the Buwch a’r Llo stones close up. Whenever I drive through here I stop the car and say hello to them. There’s rarely anyone around, so I don’t have to worry about being locked away!
Just visible above the Llo stone (i.e. the smaller of the two), below the light grey horizon, is Dinas.

Taken July 20th 2002: This shot gives you an idea just how close to the road the Buwch a’r Llo stones are. You can’t really miss them. They’re on the right-hand side of the road after the cattlegrid, coming from the Penrhyn Coch direction.

Taken 20th July 2002: Mynydd March is easy to miss if you’re casually driving past, especially in the summer when the grass is tall. Coming from the direction of Penrhyn Coch, it’s on the right-hand side of the road before the cattlegrid.

Taken when we visited Brodgar in August 1997, this beautiful floral offering was perched on one of the stones. It contrasted a bit with the crowds of tourists.

Taken August 1997: This photo shows the interior of the tomb looking in the same direction as the previous photo (posted by ‘a23’) but with a whopping wide angle lens on the camera. There’s plenty of light in the tomb because the concrete roof has a skylight built into it.

Taken August 1997: Another sunlit shot of Brodgar, this time looking across the henge (in the foreground) into the stone circle.

Taken August 1997: Here’s Lou looking all happy in her biker boots. It was a beautiful day, and we were just happy to have finally made it to this amazing place.

Taken January 1996 on the way back to Oxford after an amazing New Year’s party near Machynlleth. I’d driven past these stones a few times before, but this time I stopped to take a look. At the time I knew very little about the site, except that it was the remains of a burial chamber.

Taken 4th August 2002: This photo was taken with the petrol station behind me, looking towards the Teddington Hands pub (in the background).
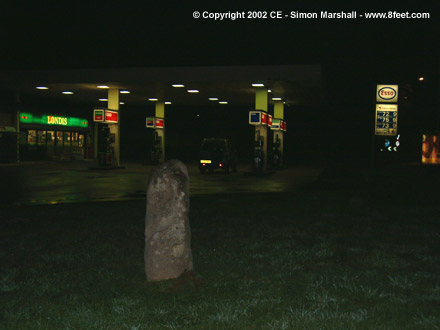
Taken on 4th August 2002 at the end of a day of visting sites in the Cotswolds. With two hours of driving ahead of us we temporarily lost the will to stick to the Esso boycott. Lou bought provisions from the petrol station while I took these photos (William was asleep in the car).

Taken August 1997: This gives you a good idea of the type of terrain that surrounds you when you visit these stones. The scenery was beautiful on the north coast, and there are so few people up there. This really is a part of Scotland that not many people seem to visit. Not a coach party in sight!

Taken August 1997: A shady spot on a scorching hot day. Shame the photo doesn’t show the cup marks, but I was under attack from horseflies when I took it, so I’m just pleased it’s in focus.

Taken August 1997: We liked this photo so much that we’ve hung a huge copy of it in our living room.

Taken August 1997 the day after I proposed to Louise at Stennes.

Taken August 1997, looking north west, this photo shows the Barnhouse Stone, with Maeshowe in the background.

Taken in July 1995 on one of those nasty little disposable cameras.

Taken January 1995: I used to live in Cumbria, so we visited Castlerigg a lot. This isn’t a fantastic picture of the site, but it does give an indication of what the weather is usually like up there! It’s a beautiful place though, and well worth a visit, even if you can’t see it for cloud.

Taken May 1995: We were on a walk from Bowness to Penrith, mostly following the Roman route called High Street. We camped overnight by the circle, and it was beautiful. I remember that one of the stones had been damaged by some idiot lighting a fire against it.

Taken Spring 1995: Here is the central stone at Mayburgh, with my good friend Flotsky leaning irreverently against it. The henge is not easy to photograph because it’s so large, with just the one remaining stone.

Taken Spring 1995: This is an amazing site. It’s sad to see a circle in this state, but the size and presence of the stones still left me impressed. As I understand it there are stones buried under the railway embankment. This means that the circle still has the potential to be restored, one day.

Taken 4th August 2002: The skies opened up when we got out of the car to walk to Belas Knap. We all got soaked, as illustrated by William (he’s not wearing a hat to keep the sun off). In case you’re thinking Belas Knap is much larger than you thought it was, I should mention that William is only three.

Taken 4th August 2002: This is the tump as we saw it, approaching down the footpath from the main road.

Taken 4th August 2002: Looking out of the tump, you can see just how big the cap stones are on the main chamber. It’s really great sitting inside the tump, but you do need a torch if you want to see anything clearly.

Taken 4th August 2002: At the moment there’s a Traveller’s camp next to the Nympsfield barrow. In case you’re wondering, the yellow blue and red object in the background is a little inflateable bouncy castle.

Taken 4th August 2002: Detail of the stone showing some of the smaller holes caused by erosion. This reminds me of the Rollright Stones in Oxfordshire.

Taken 4th August 2002: An ‘edge on’ view of the Longstone.

Taken 4th August 2002: This is the barrow viewed from (approximately) the north. The photo is taken from the footpath that runs alongside the hedge.

Taken 4th August 2002: One of the porthole entrances to the barrow, with my foot (in its second appearance on this site) for scale.

Taken 23rd July 2002: This site has no sign to mark it, so I don’t know what the ‘experts’ think it is. According to the Web site that Riot Gibbon has posted, it’s a Bronze Age barrow, but I’ve heard mumblings that this might not be the case. Does anyone know any more?

Taken 1st August 2002: This has got to be the strangest thing I’ve posted so far. Clearly there’s not much sign of the Great White Mound in this photo, but the Norman keep of the Tower of London stands on it (allegedly). Even close up, I can’t see any trace of the Mound, but this site has been mucked around with so much (post William the Conqueror) that I guess I shouldn’t be surprised.

This photo was taken on 16th June 2002, looking in the direction of Ysbytty Cynfyn. The site is called Dolgamfa (pronounced doll-gam-va) and it’s about half a mile to the west of Ysbytty Cynfyn on the other side of the Rheidol gorge. You can get to it from Ysbytty Cynfyn by crossing over Parson’s Bridge. Dolgamfa is usually described as a kerb cairn, but it works well as a small stone circle.

Taken 20th July 2002: Mitchell’s Fold is on Common Land, so you’re not supposed to drive near it. In practise farm vehicles drive right past it (I was waiting for this one to go through the middle of the circle, but he skirted round it).

Taken 20th July 2002: There was serious rain bearing in on us from the west when I took this. The only view that wasn’t obscured by rain was this one (looking south west).

Taken 20th July 2002: I took this as we walked away from Hemford Circle, looking north across two fields. I liked the way that the shape of the copse on the hill [Callow?] mirrored the circle underneath [barely visible I’m afraid, but so I’ve added a little red arrow pointing at the centre stone].

Taken 20th July 2002: In this shot (looking approximately south west) William is standing on the tiny outlying stone [probably a cairn], and Lou is standing in the cut grass between the outlying stone and the main circle. You can see how close to the stones the farmer must get with his tractor!

Taken 20th July 2002: This is what appears to be a tiny outlying stone [according to baza it’s part of a cairn], which was completely covered by tall grass. We only realised it was there because the farmer has left a small satellite circle of uncut grass next to the main circle. My foot is supposed to be for scale.

Taken 20th July 2002: Looking south west towards Corndon Hill (itself sprinkled with tumuli) you can see one of the stones on the north side of the circle in the foreground. If you follow an imaginary line from the left-hand side of Corndon Hill, straight down, you can see the central stone. Just behind this to the left are two stones on the south side of the circle.
It’s tricky to get a good photo of all the stones at Hemford because they’re hidden in the long grass.

20th July 2002: This is William plodding towards Hemford Circle (the circle is hidden in the tall grass at the top of the field). We were all a bit wet by this stage because none of us had proper boots on.

Taken on 16th June 2002 at the end of an amazing walk from the village of Ystumtuen, over the Rheidol gorge to Ysbytty Cynfyn.

Taken on 23rd July 2002. I thought this photo was worth posting because it’s a bit different. It’s taken from underneath the dolmen, looking (very approximately) west.

Taken on 23rd July 2002. It was my son William’s first visit, and he loved it. He immediately decided that the dolmen was a house, and pretended to make us both a cup of tea.
