
Taken 2nd August 2003: The cairn from the direction of the footpath (that would be the west).
Image credit: Simon Marshall
Taken 2nd August 2003: The cairn from the direction of the footpath (that would be the west).

Taken 2nd August 2003: Viewed from approximately the east.

Taken 2nd August 2003: Scouting ahead, I got to the stone before the others. As they came round the corner of the forestry plantation they startled some geese, which took off and flew into my photo. This shot is taken from the south.

Taken 2nd August 2003: A close-up of the eastern edge of the stone, showing the veins of quartz that run through it.

Taken 2nd August 2003: Looking south west(ish) towards the lane.

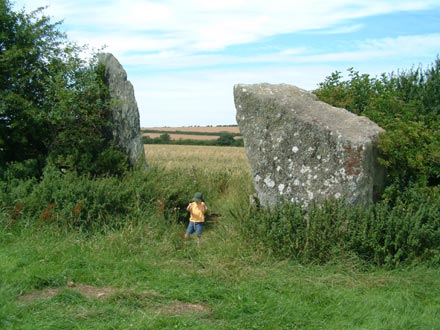
Taken 2nd August 2003: Viewed from the south west. Between the stone and the trees runs a small stream called Afon Braint.

Taken 2nd August 2003: The bank to the west of the site, with William for scale (he’s just over 1 meter tall). The gap in the bank that William is standing on appears to be ancient, but whether it’s part of the original design is anyone’s guess.

Taken 2nd August 2003: Viewed from near the modern entrance to the site, looking north west.

Taken 2nd August 2003: From the east, giving an indication of how thin the western stone is.

Taken 2nd August 2003: Viewed from the south east.
Taken 2nd August 2003: From the east (or there abouts) with William standing next to the stones (approx 1 metre tall).

Taken 2nd August 2003: From (approximately) the south west, with Plas Newydd in the background.

Taken 2nd August 2003: The chamber from the south, with the drive in the background.

Taken 2nd August 2003: The chamber viewed from the direction of the house (approximately east) with the National Trust coffee shop secreted behind the capstone on the left.
There’s a solitary boulder visible to the right of this shot. It’s on the other side of the track nearer the gatehouse. I would have liked to have taken a closer look, but circumstances didn’t allow.

Taken 25th July 2003: The stone from (approximately) the south.

Taken 25th July 2003: Maen Llog now stands between an old lamp post and a sundial outside the church.

Taken 25th July 2003: Looking approximately south, down Salop Road.

Taken 25th July 2003: From right to left, the peaks of Moel y Golfa, New Pieces and Breiddin Hill, as viewed from just south of Trewern.

Taken 17th July 2003: Inside the cave, looking in towards the area where the roof has caved in.

Taken 17th July 2003: The cave entrance, which isn’t all that easy to find.

Taken 17th July 2003: Looking into the cave. I’d not had the sense to bring the torch with me, so I didn’t go much further in than this.

Taken 17th July 2003: Looking out of the cave entrance. My rucksack is on the floor to the left, giving some idea of scale.

Taken 17th July 2003: The cave entrance. I suffered greatly at the hands of gigantic stinging nettles to get this shot!

Taken 16th July 2003: The western stone viewed from the south west, with the beautiful village of Bow Street just visible in the distance.

Taken 16th July 2003: Viewed from the west with IGER and the eastern stone (marked in red) in the background.

Taken 16th July 2003: Viewed from the east .

Taken 13th July 2003: The stone from the south, with William alongside it. He’s just over 1 metre tall, but he’s standing a bit too far back to give an accurate indication of the stone’s height.

Taken 13th July 2003: One of a number of hollows in the stone that have been used to deposit coins. Most of these had small bits of quartz placed in them blocking them, so at first glance they weren’t visible.

Taken 13th July 2003: The stone from the west.

Taken 13th July 2003: Viewed from the track to the south west of the stone, looking up the cul-de-sac that has been left in the forestry plantation.

Taken 3rd July 2003: Mynydd March stone from the north east.

Taken 3rd July 2003: The Mynydd March stone from the south west. Things have changed a bit in the area to the north of the stone because the forest has recently been clear-felled.

Taken 26th June 2003: The Castell Coch stone (to the left) with some sort of tyre damage running alarmingly close to it. Why anyone would try driving through this boggy area I have no idea, but something big had churned things up.
I took this photo standing on top of the spare wheel of our 4x4 (parked on the road).

Taken 21st June 2003: The Kinnerton Court Stone from the north east.

Taken 21st June 2003: The stone from the north east.

Taken 21st June 2003: The Four Stones from (something approximating) the west. I wanted to show just how close the they are to the road and a nearby house.

Taken 21st June 2003: This photo is a composite of two images, the idea being to show the view through the tree, towards the distant lump (Burfa Camp?). Obviously it’s a dodgy technique, giving a slightly erroneous view of the hill, but it almost works.

Taken 21st June 2003: The three cupmarks are on the top of the south west stone. They’re a bit tricky to spot, and almost invisible to the camera. I scraped together three one penny coins, and stuck them in the cupmarks to show where they are.

Taken 21st June 2003: Other than the enormous fossilised ammonite on the exterior of the tomb, this was the largest that I spotted. I can’t remember exactly where it is, but I think it’s on the right as you go down the chamber.

Taken 21st June 2003: This photo is an attempt to show the fossilised shell fish on the rock (on the right, not far into the chamber).
While I was at it, I thought I’d incorporate one of the metal supports that hold it up (presumably from the most recent ‘restoration’). The metal bar is a useful landmark if you’re interested in finding the fossils in the shot.

Taken June 21st 2003: The far end of the chamber, with William (just over a metre in height) for scale. Note the metal bars holding the ceiling up.
Lou speculated that the narrow part of the passage in the foreground might be interpreted as the cervix of the reclining mother figure (if that’s what the barrow represents). That would put William squarely back in the womb!

Taken 21st June 2003: The long barrow from the south (south) east, with the village of Wellow visible in the background.

Taken 21st June 2003: The stone from the east, with the road visible behind the fence.

Taken 21st June 2003: The Bride Stone, with the church making a nice backdrop (juxtaposition of ritual sites etc – all a bit obvious).

Taken 21st June 2003: Looking down the length of the Parson Stone, with the pub in the background. It was very early in the morning, so the pub garden was empty, except for the glasses, bottles, crisp packets and fag ends of the night before.

Taken 21st June 2003: One of the stones on the west side of the circle.

Taken 21st June 2003: The south side of the circle as viewed from the gate (i.e. the east).

Taken 21st June 2003: The east side of the circle, as viewed from the gate (standing on it it with baby on back). Sadly the delightfully named village of Chew Magna is not visible from this angle.

Taken 21st June 2003: After watching the Solstice sunrise near the North East Circle, we made our way across the Great Circle then back to the South West Circle. Here are Lou, Will and Richie Rabbit all looking a bit tired.

Taken 21st June 2003: One of the great fallen stones of the North East Circle, viewed from the west. The hazy smoke in the foreground is a burning incense stick left by the Druids. I believe it represented ‘fire’ part of a blessing of fire and holy water (from a plastic mineral water bottle?).
This photograph is my 1000th posting to the Modern Antiquarian. It’s also exactly one year since I first posted anything to the site. What a strange way to spend your time!