
8 years on, Cat Cairn 2 is now surrounded by birch scrub and gorse, and not so easy to locate.
Image credit: Les Hamilton
8 years on, Cat Cairn 2 is now surrounded by birch scrub and gorse, and not so easy to locate.
Caithness Brochs Project have recently updated their website with details and images relating to their intent to build a ‘modern’ broch.
A farmer has been fined £18,000 for destroying a Neolithic site on Skye.
Duncan MacInnes used the earth from Upper Tote Cairn to help with a shed-building project elsewhere on his land.
Full report can be read here.


This is the striking seascape across the bay, to the south of which stands Acairseid an Rubha promontory.
The island of Eigg is seen in the distance.
September 12,2021
Rather embarrassingly, on returning from a trip to the Isle of Skye, I discovered on checking the GPS data in my photographs, that I had not in fact visited Acairseid an Rubha promontory fort. I had in fact visited a headland on the opposite (north) side of the bay! Fortunately, I found that two of the coastal scenes I had photographed did in fact include Acairseid an Rubha and they are presented above.
Acairseid an Rubha is accessed from the car-park at the end of the A851 from Broadford, where a wide metalled track heads to Point of Sleat. After two kilometres, at the point where the signed path heads sharp left southwards towards Point of Sleat, the track continues towards the west coast. It is now under a kilometre to the fort.
As for the fort, I hope to visit it next time I’m on Skye. Very little seems to be known about it, and even Canmore has nothing significant to state other than that it is a “possible dun”.
Visited: June 23, 2021
Tulach Beag is a dilapidated broch which can be visited as part of an excursion to the much more impressive Tulach Mor. As the remains of this broch have a fairly low profile, it is recommended to follow the route to the nearby Tulach Mor, then walk about 460 metres northwards along the bank of the River Thurso. As you approach, Tulach Beag becomes evident, just 40 metres inland from the river. No trace of walling, outer or inner, remains here.
Route Map
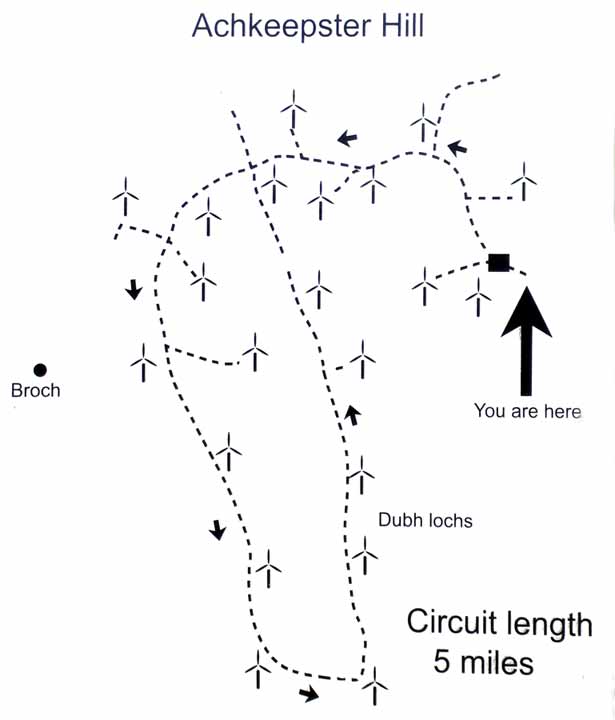
The map of Causeymire Windfarm on the Tulach Mor page actually shows the location of this broch.


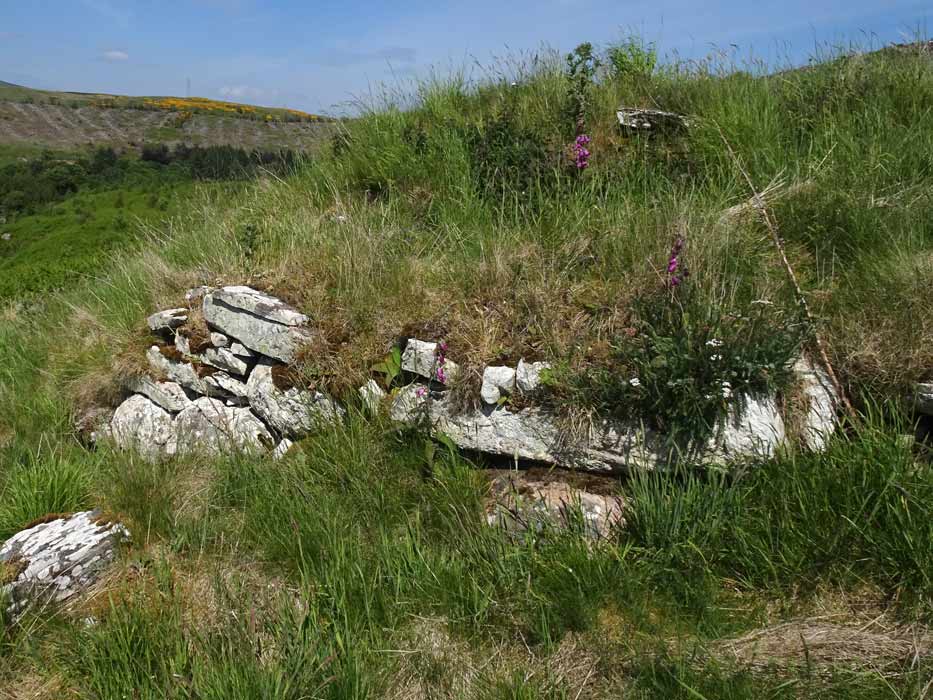
Looking south across the saucer-spaped court of Tulach Beag, towards the River Thurso.


The ‘classic’ view of Tulach Mor from the south, with the River Thurso to its left.

From the north, Tulach Mor shows just this grass covered dome.


The southwest aspect of Tulach Mor showing the remaining external walling courses.

A close-up view of the main exposed walling courses on the southwest of Tulach Mor.

Some exposed remnant internal walling shows at the top of the broch wall to the north of the structure.

View across the saucer shaped summit of Tulach Mor, which is mainly grassy with just the odd stone peeking out here and there.

View across the shallow saucer-lihe summit of Tulach Mor.

On the inside western wall of Tulach Mor is this exposed lintel leading to an intermural cavity of some sort.

Interior detail beyond the exposed lintel, revealed with a flash exposure.

Photograph showing the map of the windfarm. This is located beside the cattle grid at the entrance to the Causeymire wind farm.
The broch illustrated on it is NOT Tulach Mor but the dilapidated Tulach Beag, which is located several hundred metres to the north of Tulach Mor.
Visited: June 23, 2021
Tulach Mor is the southernmost of the Westerdale brochs in Caithness, and stands adjacent to the River Thurso in the Causeymire Windfarm near Achkeepster. Unusually, perhaps, walkers are actively welcomed to explore the area of this windfarm. Access is via a good metalled road to the windfarm, to the west of the A9 and about 1½ kilometres south of Mybster.
Be aware that the much more expansive Halsary Windfarm lies immediately adjacent to and south of the Causeymire Windfarm (but is not at present shown on the OS map). Its spacious entrance is just a few hundred metres farther south. On my first visit to the area, I parked in the entrance to this windfarm and found the layout totally different to the windfarm shown on the OS map. If in doubt, look for the Map illustrated in the Artistic / Interpretive: section above. If you don’t see a sign bearing this map beside the cattle grid at the start of the road leading into the windfarm, you are in the wrong windfarm!
Route to Tulach Mor
The purple marker “P” indicates the parking area at the windfarm entrance (you are not permitted to drive your vehicle into the windfarm). The green markers show the locations of the Tulach Mor and Tulach Beag brochs. The southern one is your target, Tulach Mor.
The walk to Tulach Mor starts with a trek of around four kilometres along a wide roughly metalled road. Keep to this road (yellow trail on the map) and avoid turning off along any of the short turbine servicing roads. All the turbines are indicated by small white markers on the map, and the one where you set off cross-country to Tulach Mor is a larger white marker indicated “X”.
When you leave the road, you have a walk over a mixture of grass tussocks, heather and sphagnum (cyan line on map) for almost 600 metres, effectively due west. The main indicator to look out for is the River Thurso. Turbine “X”, is the first turbine from which you can actually see the river, so basically just make for it. The terrain is mixed, and the easiest stretches are the frequent grassy tongues. I visited in drought conditions, but I reckon the superabundant sphagnum could be a problem in wetter times. Almost at once, you should see the broch mound in the distance.
Tulach Mor is a prominent mound abutting the eastern river bank close to where the River Thurso dog-legs sharply towards the southwest. The broch stands on a rock with a steep face on the south and west and was originally protected by a ditch around its eastern side. On the east is a field of tumbled masonry, presumably the remains of a severely quarried wall that formerly crowned the ditch.
There’s not a great deal of walling remaining, except on the south and southwest, where several courses of neat blocks endure. For the rest, the structure is just a grass-covered dome with a saucer-shaped depression in its summit, characteristic of the filled-in court seen in many brochs. On the northern arc of the summit some stonework of the broch’s inner wall still protrudes while on its inner western wall is a lintelled breach leading to an intra-mural cavity.
Visited: June 23, 2021
Rumster broch stands in Rumster Forest, not far from the broch at Golsary. Sadly, there is little to see other than a green mound with no evidence of stonework at all.
To access Rumster broch, follow the directions on the Golsary page but, instead of taking the turning to the right, continue south for about 700 metres then take the forest road to the left (east). Rumster broch is immediately evident in the field on your right.
Canmore does state that “one course of a curved wallface, made of heavy stones, is exposed in the south-west arc”. I daresay that in spring, before the rank nettles and thistles hold sway, it might be easier to locate.

The gate and high fence, with slatted stile, that gives access to the broch in the area to the right.

This is the view of Borgue Langwell broch from the gate.

Borgue Langwell broch , showing its best (southwest) side, with walling courses reaching up to a metre high.

The stonework on the northern side of the broch has long since completely collapsed into this anonymous stoneheap.

The view across the northern stoneheap to the broch mound.
This is the most complete stretch of walling courses, located on the southwest of the broch. In places it measures over a metre tall.

Rudimentary walling course material on the south flank of the broch.

Isolated blocks peek out from the grassy dome of Borgue Langwell broch.
Visited: June 23, 2021
Golsary broch lies in Rumster Forest, not far north of Latheron in Caithness. All that remains these days is a conical vegetated mound at the end of a low ridge in a clearing in the woodland. Close by are the ruinous remains of Golsary farmstead.
What impresses most on first sight is the height of the broch, which stands almost four metres tall atop the south end of the ridge. There was no sign of any stonework at the time of my visit, when the entire structure was buried under quite dense vegetation.
To the north, the ridge has been excavated to create a defensive ditch about two metres in depth, somewhat exaggerated by heaps of discarded spoil which have formed a rampart either side of it.
Getting There
Access to Golsary broch is easiest from the A9. Some 9 kilometres north of Latheron, just past Loch Rangag, a side road (signposted “Lybster 7”) heads off to the right towards Rumster Forest. There, about 0.5 km after you enter the woodland, there is a car park on the left (blue marker on the map above). From here it is a walk of 2 kilometres southwards to the broch. The route is labelled ‘Cycle Route’ on the OS map.
Keep heading south and take the second turning on the right which leads gently downhill into a shallow valley. Best plan is to make for the U-bend in the road and follow the stream to the broch (red marker on map). Everything here is densely vegetated and you simply have to bash through it to your goal: there is no path.

This composite of two photographs shows the profile of Ousdale Burn broch, with the entranceway in centre.

External view of the entrance passage and its blocky supporting lintel, now cleared of obstructions.

Looking into the interior of Ousdale Burn broch, through the restored entrance passage,

This image shows the consolidated walling adjacent to the entrance passage, from the internal court.

This is a composite panoramic photograph taken from the wallhead and looking towards the entrance.

This is a composite panoramic photograph taken from the wallhead and shows the entrance to the intra-mural stairway on the left.
The scarcement ledge is visible high up the wall in the centre of this view.

This is a composite panoramic photograph taken from the wallhead. The entranceway is at the extreme right while the aumbry in the walling is shown slightly left of centre.

The prominent scarcement ledge, which would originally have supported either an upper floor or a roof over the structure.

The wall recess (aumbry), possibly a storage area, containing a strange mis-shapen bust!

The large intra-mural chamber, viewed from the wallhead.

The intra-mural stairs, now cleared of rubble and vegetation, which would have led to the upper level of the broch.


